Showing posts with label book review. Show all posts

Thursday, January 8, 2015

Medallion Baby Quilt

So far, 2015 is off to a great start for me in my quilting pursuits.  True to form, I work better under a deadline and managed my first finish of the year in a mere 3 days :)


 I found out several months ago that a good friend and co-worker's wife was pregnant with their first baby and had been planning to make them a quilt since they made the announcement  Of course with me binge watching Gilmore Girls and Orange is the New Black slacking off, and with Holiday crazy-ness, I didn't get a start until after Christmas even though I knew the baby shower was quickly approaching.

I got a copy of of Angela Pingel's A Quilter's Mixology and from the moment I picked it up, I wanted to make every single quilt in it.  I thought the Medallion Baby Quilt would be a good start and perfect for a gift for the expecting couple.  Angela's instructions for how to sew the curves and the patterns are fabulous.  I will definitely be making more quilts from this book :)


Keeping #SewMyStash2015 in mind, I took stock of my fabric stash and did an initial sketch and pull.


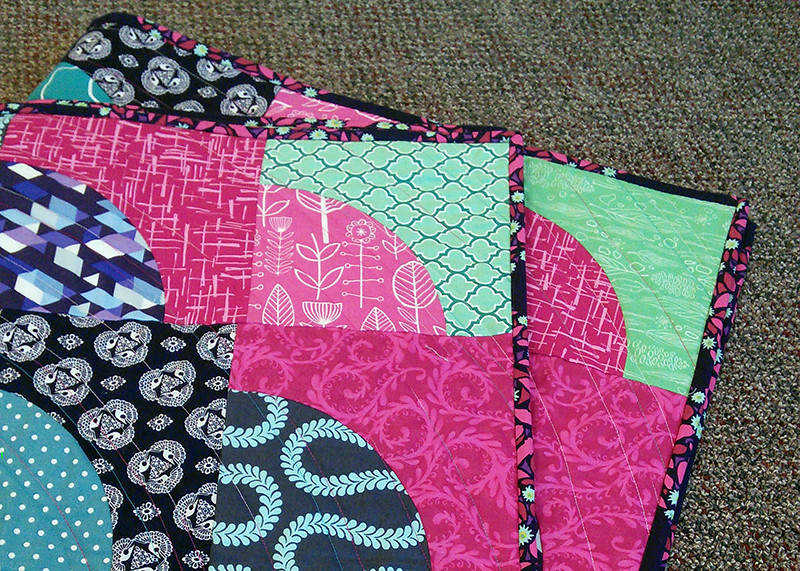
The hardest part for me was cutting the templates accurately with the curves.  I purchased "heavy weight" template plastic from Joann's several months ago, but it was total junk and my rotary cutter sliced right through it and my pieces weren't accurate at all.  Frustrated, I broke down and bought Marti Mitchell's Drunkard's Path templates which made the job so much easier!  I ended up getting all the sizes available so I can make other quilts in the book more easily :)  The proportions aren't exactly the same as the templates Angela has in the book, but I think it still looks great.


Other than the difficulty cutting, the quilt came together so quickly.  Ryan actually made a comment that if I could finish this in 3 days, why had I been working on our bed quilt for a year and a half (because this quilt only has 72 pieces and is baby sized!)  The top is made of a variety of prints, entirely from my stash.  Each block finishes at 7" square.


For the quilting, I decided to go simple and just concentric circles using my walking foot.  The circles are randomly spaced over the quilt at 1/2" or 1 1/2" increments.  I used a lovely blue, white and pink variegated Aurifil from the Tula Pink collection.


After a quick poll of my Instagram friends, I chose a print from Anna Maria Horner's Field Study for the binding.  It's completely by chance that the print contained all the colors that I used in the quilt.  I had just enough to finish off the binding (another 1/2 yard used from the stash!)  I machine stitched the binding down since I was on a deadline and for durability.  I found a dark purple Gutterman I had in my thread stash that blended really well.


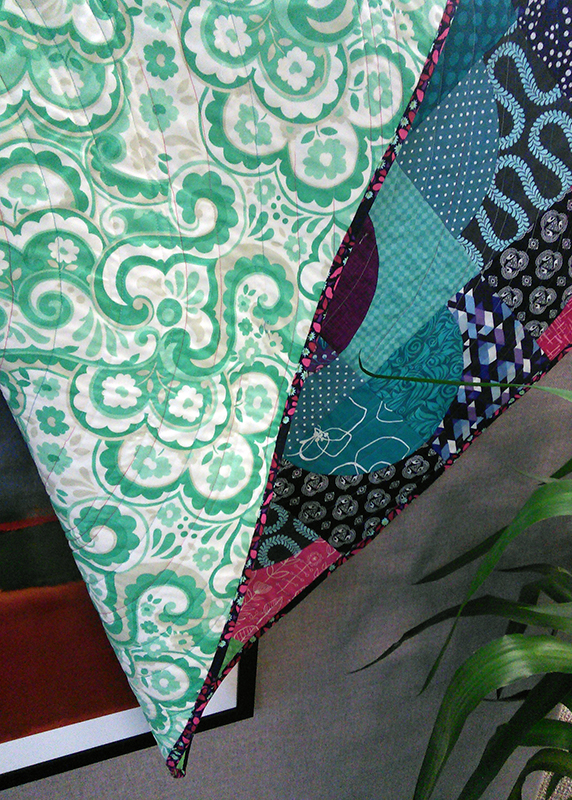
The backing is the only fabric I purchased for the quilt.  I knew the baby's room was a minty green, so I thought this large scale Heather Bailey Up Parasol print would be perfect.  The pattern calls for 2 1/2 yards for the backing, but I only ended up using a yard and a half since the quilt finished at 42"x42".


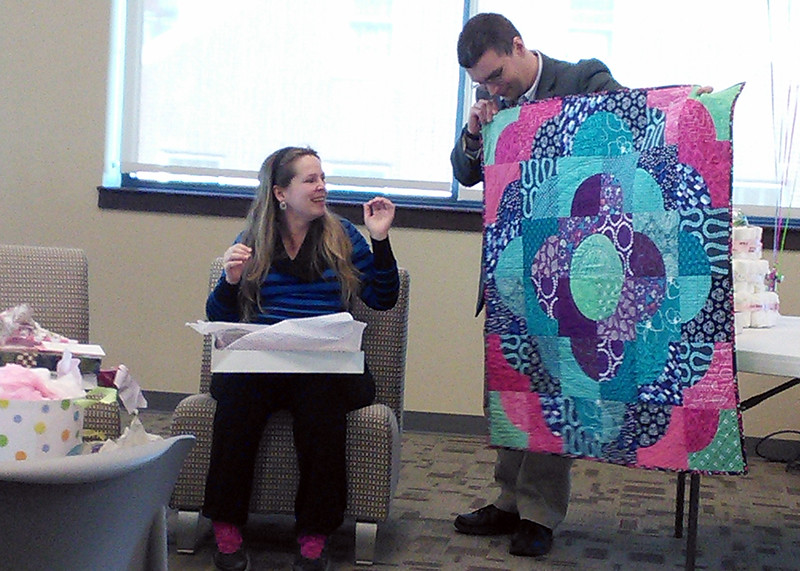
I gifted the quilt at the baby shower and soon-to-be mommy and daddy both loved it.  I hope the baby will love and use it for a long time :)

Specs at a Glance:
Top: 7 inch Drunkard's Path blocks in various cotton prints
Finished size: 42" square
Pieced and Quiltied with Auriful 50 thread
Batting: Quilter's Dream 100% Cotton Batting
Pattern from A Quilter's Mixology
Finished: January 3, 2014


Linking up with TGIFF and #sewmystash2015on Instagram

Wednesday, December 4, 2013

WIP Wednesday -- Scrap Attack edition

I've been terribly remiss in my blogging lately.  Things are finally calming down at the library, but with the Holidays things are busy at home... a girl can't win.  This post should really be all about the holiday sewing that I'm doing, but I haven't even started it yet.

Instead I've been playing with my prolific scrap pile.  I posted this pic on Instagram last week (play along with #scrapbagofshame).  I really don't know how I generate so many scraps considering I have yet to finish a quilt... but i do, so I'm turning them into useful things.


Have you looked at Sunday Morning Quilts?  They have so many beautiful scrap projects in the book that I thought it would be a good starting point to try to tame this pile.


I started with the Scrapper's Delight quilt  because I have lots of strips and strings and I was thinking it would be a good charity quilt and opportunity to practice FMQ.  I have three blocks complete, and many in progress blocks (yay chain piecing!)  I'm loving how they're turning out so far :)


I got so tired of sorting through the huge scrap pile that I decided to try another project from the book -- scrap storage baskets.  They're coming together really quickly from my larger scraps.  I've been using the Quilt as you Go method to make the panels instead of sewing a slab then quilting. 

Since this was spur of the moment, I just need to get the correct interfacing for the lining and then I'll have the red complete.

 I didn't plan the orange slab as well, so it has some random scraggly bits that I'm hoping get lost in the seam allowance.

In other QAYG scrappy news, I finished my Modern Scrappy Bits item.  It's Jeni Baker's Half-Square Triangle Pouch tutorial but made with QAYG panels.  Didn't it turn out so cute?!


My partner asked for low volume and aqua.  Surprisingly I didn't have that many aqua scraps, so I'm happy I was able to come up with enough to add some color.

I'll probably table these projects for the week because I'm hoping to catch up on the rest of my commitments for the month (bee blocks, swaps), then get my Christmas stockings sewed up :)  What have you been working on?

WIP Wednesday at Freshly PiecedLinking up with Freshly Pieced for WIP Wednesday

Sunday, April 7, 2013

Knitting Needle Roll

I finally gave my dear friend, Val, her Christmas/birthday present this weekend. Late is better than never right?

I borrowed Modern Log Cabin Quilting from the library (my work!) with the intention to make the log cabin clutch. Instead I decided to use some of the log cabin blocks to make up the front of the knitting needle roll.  The quilts in this book are absolutely gorgeous, and the patterns and construction are really easy to follow.  Being a newbie quilter, I had no idea that there were so many ways to assemble a log cabin :)  Unfortunately, I had to borrow the book through our state-wide interlibrary loan system, so I don't have it in my possession anymore to do an in depth review.


This was my first real quilting project that I finished.  I started working on it in November, a month after teaching myself how to sew.  I got so overwhelmed and busy during the holidays that it got shelved until March when I finally sat down and finished it.  Val told me that her favorite colors are red, pink, and black so I decided to go with a gradient effect.

I used a very simple straight line stitch through the middle of each log for the quilting, and just about every grey, black, red, and pink fabric that I had in my stash at the time.

It's pretty huge, I think it turned out to be around 18"x24", probably overkill but I had no idea how big the log cabins were going to be when finished, I just cut strips and started sewing.

The border and the inside are made from a black twill that I got from the remnant bin at Joanns.  I figured a heavier fabric would be more durable than quilting cotton and would stand up to pokey knitting needles better.  To make the inside, I modified this tutorial at Made by Loulabelle to fit my dimensions.

All-in-all, I'm pleased with how it turned out.  Val says she has been getting so many complements on it when she goes to classes at her local knitting shop, and tells me I'd definitely be able to sell them.  With how much time I spent making it, I would have to charge like $200 for all my blood, sweat and tears, lol.  There was a lot of improvising on my part because I really had no clue what I was doing really.  I guess the best way to learn is still trial and error :)